这段时间非常火的topic,大模型参数多,占用体积大训练困难,而且一般需要微调技术用于特定任务.
AnimeBot.ipynb - Colaboratory (google.com)我的完整代码
什么是大模型LLM
LLM是大型语言模型的缩写,是人工智能和机器学习领域的最新创新。2022年12月,随着ChatGPT的发布,这种强大的新型人工智能在网上疯传。对于那些足够开明的人来说,生活在人工智能的嗡嗡声和科技新闻周期之外,ChatGPT是一个在名为GPT-3的LLM上运行的聊天界面。
最近的大模型就是Meta的llama2当然还有openai的GPT4,google的PaLM2.国内有清华的ChatGLM等等.
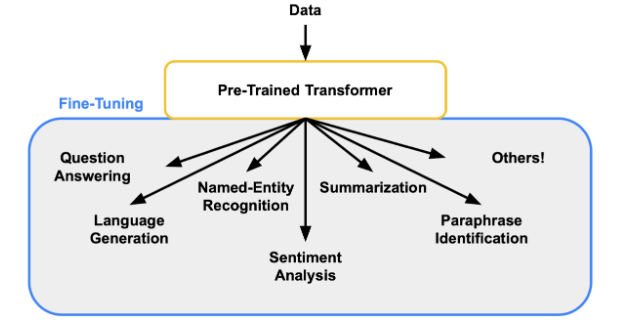
而大模型微调就是在此基础上更改其参数或者一些层使得更好应对一些下游任务.当你想将预先存在的模型适应特定的任务或领域时,微调模型在机器学习中至关重要。微调模型的决定取决于您的目标,这些目标通常是特定于领域或任务的。

现在关于微调的技术有很多,这些技术都是为了解决自己的specified task,一般需要特定的数据.
一般涉及三种方法。Prompt Engineering,embedding以及finetune也就是微调.
Prompt Engineering
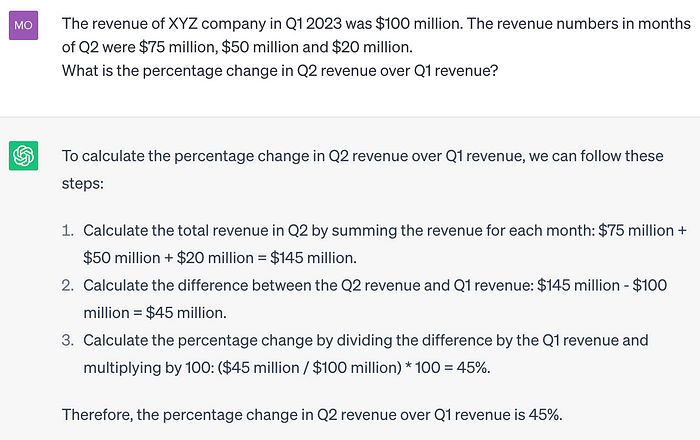
简单来说就是跟模型对话时提前给一些已知的信息.

这种方法简单,但是由于将大文本传递到LLM的提示大小和相关成本的限制,使用大文档集或网页作为LLM的输入不是最佳方式。
Embeddings
嵌入是一种将信息(无论是文本、图像还是音频)表示为数字形式的方式

当需要将大量文档或网页传递给LLM时,嵌入效果很好。例如,当聊天机器人被构建为向用户提供一组策略文档的响应时,这种方法会很好地工作。
使用时需要将文本等内容生成embedding,这就需要seq2seq模型得到嵌入了.当用户想要查询LLM时,嵌入将从向量存储中检索并传递给LLM。LLM使用嵌入从自定义数据生成响应。
Fine tuning

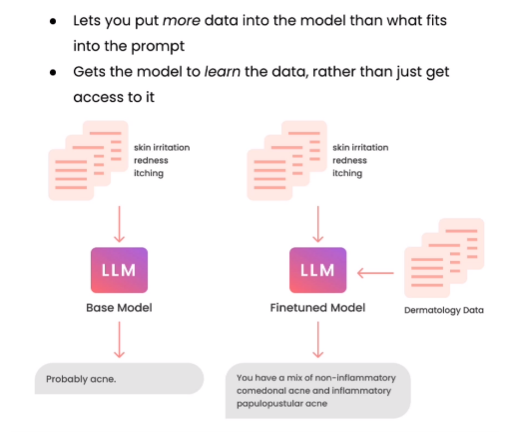
微调是教模型如何处理输入查询以及如何表示响应的一种方式。例如,LLM可以通过提供有关客户评价和相应情绪的数据来进行微调。
微调通常用于为特定任务调整LLM,并在该范围内获得响应。该任务可以是电子邮件分类、情绪分析、实体提取、基于规格生成产品描述等
具体的微调技术有Lora,QLora,Peft等等
Fine tuning技术
old school
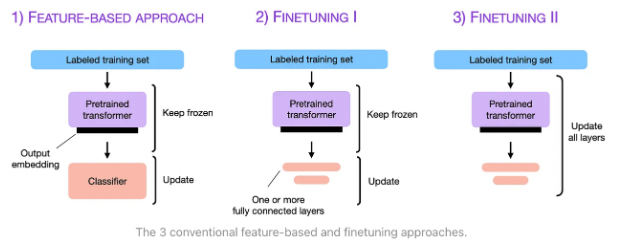
在老派的方法中,有各种方法可以微调预先训练的语言模型,每种方法都是根据特定需求和资源限制量身定制的。
- 基于特征:它使用预先训练的LLM作为特征提取器,将输入文本转换为固定大小的数组。一个单独的分类器网络预测NLP任务中文本的分类概率。在训练中,只有分类器的权重会改变,这使得它对资源友好,但可能性能较差。
- 微调I:微调I通过添加额外的密集层来增强预先训练的LLM。在训练期间,只调整新添加的层的权重,同时保持预先训练的LLM权重冻结。在实验中,它显示出比基于特征的方法略好的性能。
- 微调II:在这种方法中,整个模型,包括预先训练的语言模型(LLM),都被解冻进行训练,允许更新所有模型权重。然而,它可能会导致灾难性的遗忘,新的特征会覆盖旧的知识。微调II是资源密集型的,但在需要最大性能时可提供卓越的结果。通用语言模型微调
- ULMFiT是一种可应用于NLP任务的迁移学习方法。它涉及一个3层的AWD-LSTM体系结构来进行表示。ULMFiT是一种用于为特定下游任务微调预先训练的语言模型的方法。
- 基于梯度的参数重要性排序:这些方法用于对模型中特征或参数的重要性进行排序。在基于梯度的排序中,参数的重要性取决于排除参数时精度降低的程度。在基于随机森林的排序中,可以对每个特征的杂质减少进行平均,并根据该度量对特征进行排序。

LLM微调的前沿策略
- 低秩自适应(LoRA):LoRA是一种微调大型语言模型的技术。它使用低秩近似方法来降低将具有数十亿参数的模型(如GPT-3)适应特定任务或领域的计算和财务成本。
- 量化LoRA(QLoRA):QLoRA是一种适用于大型语言模型(LLM)的高效微调方法,可显著减少内存使用,同时保持完整的16位微调性能。它通过将冻结的4位量化预训练语言模型的梯度反向传播到低秩适配器中来实现这一点。
- 参数高效微调(PEFT):PEFT是一种NLP技术,通过只微调一小组参数,降低计算和存储成本,使预先训练的语言模型有效地适应各种应用。它可以消除灾难性的遗忘,为特定任务调整关键参数,并提供与图像分类和稳定扩散dreambooth等模式的全面微调相当的性能。这是一种在最小可训练参数的情况下实现高性能的有价值的方法。
- DeepSpeed:DeepSpeed是一个深度学习软件库,用于加速大型语言模型的训练。它包括ZeRO(零冗余优化器),这是一种用于分布式训练的内存高效方法。DeepSpeed可以自动优化使用Hugging Face的Trainer API的微调作业,并提供一个替代脚本来运行现有的微调脚本。
- ZeRO:ZeRO是一组内存优化技术,能够有效训练具有数万亿参数的大型模型,如GPT-2和图灵NLG 17B。ZeRO的一个主要吸引力是不需要修改模型代码。这是一种内存高效的数据并行形式,可以让您访问所有可用GPU设备的聚合GPU内存,而不会因数据并行中的数据复制而导致效率低下。
现在一般用lora及其衍生方法以及PEFT.
微调用的数据集可以自己做也可以到处找,比如hugging face上或者Google dataset,github上.
至于模型一般使用hugging face或者langchain等工具库直接调用,没有必要手动下载.获取到一般的语言或者其他类型的数据之后,一般都需要embedding等预处理步骤.embedding模型一般要与处理任务的模型有一定对应关系.
下面使用Hugging Face的transformers等库进行大模型微调.常常使用AutoModel,AutoTokenizer以及AutoConfig,通过调用from_pretrained获取相关信息.下面是一般训练流程.
训练流程
1 | # Transformers installation |
1 | from datasets import load_dataset |
上面的compute_metrics用于评估模型.training_args是训练时设置参数1
2
3
4
5
6
7
8import numpy as np
import evaluate
metric = evaluate.load("accuracy")
def compute_metrics(eval_pred):
logits, labels = eval_pred
predictions = np.argmax(logits, axis=-1)
return metric.compute(predictions=predictions, references=labels)
可以使用trainer.push_to_hub()推送到自己的仓库.这样会自动将训练超参数、训练结果和框架版本添加到您的模型卡中
PEFT训练adapters
使用PEFT训练的适配器通常也比完整模型小一个数量级,便于共享、存储和加载。通常搭配Lora模型.1
2
3
4from transformers import AutoModelForCausalLM, AutoTokenizer
peft_model_id = "ybelkada/opt-350m-lora"
model = AutoModelForCausalLM.from_pretrained(peft_model_id)
加载和使用PEFT适配器型,请确保Hub存储库或本地目录包含adapter_config.json文件和adapter weights.
也可以先加载基础model,再使用load_adapter1
2
3
4
5
6
7
8from transformers import AutoModelForCausalLM, AutoTokenizer
model_id = "facebook/opt-350m"
peft_model_id = "ybelkada/opt-350m-lora"
model = AutoModelForCausalLM.from_pretrained(model_id)
model.load_adapter(peft_model_id)
load_in_8bit以及device_map涉及到将模型放哪和占用大小.
增加adapter1
2
3
4
5
6
7
8
9
10
11
12from transformers import AutoModelForCausalLM, OPTForCausalLM, AutoTokenizer
from peft import PeftConfig
model_id = "facebook/opt-350m"
model = AutoModelForCausalLM.from_pretrained(model_id)
lora_config = LoraConfig(
target_modules=["q_proj", "k_proj"],
init_lora_weights=False
)
model.add_adapter(lora_config, adapter_name="adapter_1")
训练一个adapter1
2
3
4
5
6
7
8
9
10
11
12
13
14from peft import LoraConfig
peft_config = LoraConfig(
lora_alpha=16,
lora_dropout=0.1,
r=64,
bias="none",
task_type="CAUSAL_LM",
)
model.add_adapter(peft_config)
trainer = Trainer(model=model, ...)
trainer.train()
model.save_pretrained(save_dir)
model = AutoModelForCausalLM.from_pretrained(save_dir)
每个 PEFT方法由PeftConfig类定义,该类存储用于构建PeftModel的所有重要参数。1
2
3
4
5
6
7
8
9
10
11
12from peft import LoraConfig, TaskType
peft_config = LoraConfig(task_type=TaskType.SEQ_2_SEQ_LM, inference_mode=False, r=8, lora_alpha=32, lora_dropout=0.1)
peft_config = LoraConfig(
r=lora_r,
lora_alpha=lora_alpha,
lora_dropout=lora_dropout,
target_modules=lora_target_modules,
bias="none",
task_type="CAUSAL_LM",
)
使用get_peft_model函数包装基本模型和peft_config以创建PeftModel.并使用print_trainable_parameters打印需要更新的参数.1
2
3
4
5
6
7
8
9from transformers import AutoModelForSeq2SeqLM
from peft import get_peft_model
model_name_or_path = "bigscience/mt0-large"
tokenizer_name_or_path = "bigscience/mt0-large"
model = AutoModelForSeq2SeqLM.from_pretrained(model_name_or_path)
model = get_peft_model(model, peft_config)
model.print_trainable_parameters()
保存并推送模型到仓库1
2model.save_pretrained("output_dir")
model.push_to_hub("my_awesome_peft_model")
这只会保存增量经过训练的PEFT重量,这意味着它在存储、转移和装载方面非常高效。例如,在RAFT数据集的twitter_complaints子集上使用LoRA训练的bigscience/To_3B模型只包含两个文件:adapter_config.json和adapter_model.bin。
下载模型
下面的方法是逻辑是首先通过PeftConfig得到peft的配置,从中得到基础模型位置,利用基础模型得到其模型和tokenizer,最后利用PeftModel得到model.1
2
3
4
5
6
7
8
9
10
11
12
13
14
15
16
17from transformers import AutoModelForSeq2SeqLM
from peft import PeftModel, PeftConfig
peft_model_id = "smangrul/twitter_complaints_bigscience_T0_3B_LORA_SEQ_2_SEQ_LM"
config = PeftConfig.from_pretrained(peft_model_id)
model = AutoModelForSeq2SeqLM.from_pretrained(config.base_model_name_or_path)
model = PeftModel.from_pretrained(model, peft_model_id)
tokenizer = AutoTokenizer.from_pretrained(config.base_model_name_or_path)
model = model.to(device)
model.eval()
inputs = tokenizer("Tweet text : @HondaCustSvc Your customer service has been horrible during the recall process. I will never purchase a Honda again. Label :", return_tensors="pt")
with torch.no_grad():
outputs = model.generate(input_ids=inputs["input_ids"].to("cuda"), max_new_tokens=10)
print(tokenizer.batch_decode(outputs.detach().cpu().numpy(), skip_special_tokens=True)[0])
'complaint'
也可以简单地使用1
2
3
4
5from peft import AutoPeftModelForCausalLM
peft_model = AutoPeftModelForCausalLM.from_pretrained("ybelkada/opt-350m-lora")
from peft import AutoPeftModel
model = AutoPeftModel.from_pretrained(peft_model_id)
实战
下载所需包
一般是hugging face的transformers,datasets以及xformers,accelerate,trl,bitsandbytes,peft等库1
2
3
4
5
6
7!pip install -Uqqq pip --progress-bar off
!pip install -qqq torch==2.0.1 --progress-bar off
!pip install -qqq transformers==4.32.1 --progress-bar off
!pip install -qqq datasets==2.14.4 --progress-bar off
!pip install -qqq peft==0.5.0 --progress-bar off
!pip install -qqq bitsandbytes==0.41.1 --progress-bar off
!pip install -qqq trl==0.7.1 --progress-bar off
数据处理
数据处理方式特别多,有很多实现方式.这里主要使用pandas与datasets处理csv数据.1
2
3
4
5
6
7
8
9
10
11
12
13
14
15
16
17
18
19
20
21
22
23
24
25
26
27
28
29
30
31
32
33
34
35
36
37
38
39
40
41
42
43
44
45
46
47
48
49
50
51
52
53
54
55
56
57
58
59
60
61
62
63
64
65animes_dataset = load_dataset("csv", data_files = "/content/animes.csv")
reviews_dataset = load_dataset("csv", data_files = "/content/reviews.csv")
animes_df = pd.DataFrame(animes_dataset["train"])
reviews_df = pd.DataFrame(reviews_dataset["train"])
merged_df = pd.merge(animes_df,reviews_df,left_on="uid",right_on="anime_uid")
# remove /n/r
def clean_text(x):
#remove multiple whitespace
new_string = str(x).strip()
pattern = r"\s{3,}"
new_string = re.sub(pattern, " ", new_string)
#remove \r \n \t
pattern = r"[\n\r\t]"
new_string = re.sub(pattern,"", new_string)
return new_string
merged_df["synopsis"] = merged_df["synopsis"].map(clean_text)
merged_df["text"] = merged_df["text"].map(clean_text)
# split merged_df into train and test
train_df, test_df = train_test_split(merged_df, test_size=0.1, random_state=42)
dataset_dict = DatasetDict({
"train": Dataset.from_pandas(train_df),
"validation": Dataset.from_pandas(test_df)
})
DEFAULT_SYSTEM_PROMPT = "Below is a name of an anime,write some intro about it" #@param {type:"string"}
DEFAULT_SYSTEM_PROMPT = DEFAULT_SYSTEM_PROMPT.strip()
def generate_training_prompt(data_point):
# 去除字符串中的方括号和空格
genres = data_point["genre"].strip("[]").replace(" ", "").replace("\'","")
synopsis_len = len(data_point["synopsis"])
split_len = random.randint(1,synopsis_len)
synopsis_input = data_point["synopsis"][1:split_len]
input = data_point["title"]+genres+synopsis_input
output = data_point["synopsis"]+data_point["text"]
return {
"text":f"""### Instruction: {DEFAULT_SYSTEM_PROMPT}
### Input:
{input.strip()}
### Response:
{output.strip()}
""".strip()
}
def process_dataset(data: Dataset):
return (
data.shuffle(seed=42)
.map(generate_training_prompt)
.remove_columns(
[
"uid_x",
"aired",
"members",
"img_url",
"uid_y",
"profile",
"anime_uid",
"score_y",
"link_y"
]
)
)
dataset_dict["train"] = process_dataset(dataset_dict["train"])
dataset_dict["validation"] = process_dataset(dataset_dict["validation"])
这里处理逻辑其实复杂了,只需要使用pandas读取数据,然后分为训练集和测试集然后转为Dataset即可.中间需要对dataframe的数据去除一些空白字符等.
训练设置
由于使用了PEFT1
2
3
4
5
6
7
8
9
10
11
12
13
14
15
16
17
18
19
20
21lora_r = 16
lora_alpha = 64
lora_dropout = 0.1
lora_target_modules = [
"q_proj",
"up_proj",
"o_proj",
"k_proj",
"down_proj",
"gate_proj",
"v_proj",
]
peft_config = LoraConfig(
r=lora_r,
lora_alpha=lora_alpha,
lora_dropout=lora_dropout,
target_modules=lora_target_modules,
bias="none",
task_type="CAUSAL_LM",
)
设置trainingArgument,使用trl进行训练.1
2
3
4
5
6
7
8
9
10
11
12
13
14
15
16
17
18
19
20
21
22
23
24
25
26
27
28
29
30
31OUTPUT_DIR = "experiments"
training_arguments = TrainingArguments(
per_device_train_batch_size=4,
gradient_accumulation_steps=4,
optim="paged_adamw_32bit",
logging_steps=1,
learning_rate=1e-4,
fp16=True,
max_grad_norm=0.3,
num_train_epochs=2,
evaluation_strategy="steps",
eval_steps=0.2,
warmup_ratio=0.05,
save_strategy="epoch",
group_by_length=True,
output_dir=OUTPUT_DIR,
report_to="tensorboard",
save_safetensors=True,
lr_scheduler_type="cosine",
seed=42,
)
trainer = SFTTrainer(
model=model,
train_dataset=dataset["train"],
eval_dataset=dataset["validation"],
peft_config=peft_config,
dataset_text_field="text",
max_seq_length=4096,
tokenizer=tokenizer,
args=training_arguments,
)
训练与后续评估测试
1 | trainer.train() |
注意
1 | from transformers import AutoModelForSeq2SeqLM |
这里model_base是1
2
3
4
5
6
7
8
9
10
11
12
13
14
15
16
17
18
19
20
21
22
23
24
25
26OPTForCausalLM(
(model): OPTModel(
(decoder): OPTDecoder(
(embed_tokens): Embedding(50272, 512, padding_idx=1)
(embed_positions): OPTLearnedPositionalEmbedding(2050, 1024)
(project_out): Linear(in_features=1024, out_features=512, bias=False)
(project_in): Linear(in_features=512, out_features=1024, bias=False)
(layers): ModuleList(
(0-23): 24 x OPTDecoderLayer(
(self_attn): OPTAttention(
(k_proj): Linear(in_features=1024, out_features=1024, bias=True)
(v_proj): Linear(in_features=1024, out_features=1024, bias=True)
(q_proj): Linear(in_features=1024, out_features=1024, bias=True)
(out_proj): Linear(in_features=1024, out_features=1024, bias=True)
)
(activation_fn): ReLU()
(self_attn_layer_norm): LayerNorm((1024,), eps=1e-05, elementwise_affine=True)
(fc1): Linear(in_features=1024, out_features=4096, bias=True)
(fc2): Linear(in_features=4096, out_features=1024, bias=True)
(final_layer_norm): LayerNorm((1024,), eps=1e-05, elementwise_affine=True)
)
)
)
)
(lm_head): Linear(in_features=512, out_features=50272, bias=False)
)1
2
3
4
5
6
7from peft import get_peft_model
lora_config = LoraConfig(
target_modules=["q_proj", "k_proj"],
init_lora_weights=False
)
peft_model = get_peft_model(peft_model_base, lora_config)
peft_model.print_trainable_parameters()
使用lora_config获取到peft_model1
2
3
4
5
6
7
8
9
10
11
12
13
14
15
16
17
18
19
20
21
22
23
24
25
26
27
28
29
30
31
32
33
34
35
36
37
38
39
40
41
42
43
44
45
46
47
48
49
50
51
52
53
54
55
56PeftModel(
(base_model): LoraModel(
(model): OPTForCausalLM(
(model): OPTModel(
(decoder): OPTDecoder(
(embed_tokens): Embedding(50272, 512, padding_idx=1)
(embed_positions): OPTLearnedPositionalEmbedding(2050, 1024)
(project_out): Linear(in_features=1024, out_features=512, bias=False)
(project_in): Linear(in_features=512, out_features=1024, bias=False)
(layers): ModuleList(
(0-23): 24 x OPTDecoderLayer(
(self_attn): OPTAttention(
(k_proj): Linear(
in_features=1024, out_features=1024, bias=True
(lora_dropout): ModuleDict(
(default): Identity()
)
(lora_A): ModuleDict(
(default): Linear(in_features=1024, out_features=8, bias=False)
)
(lora_B): ModuleDict(
(default): Linear(in_features=8, out_features=1024, bias=False)
)
(lora_embedding_A): ParameterDict()
(lora_embedding_B): ParameterDict()
)
(v_proj): Linear(in_features=1024, out_features=1024, bias=True)
(q_proj): Linear(
in_features=1024, out_features=1024, bias=True
(lora_dropout): ModuleDict(
(default): Identity()
)
(lora_A): ModuleDict(
(default): Linear(in_features=1024, out_features=8, bias=False)
)
(lora_B): ModuleDict(
(default): Linear(in_features=8, out_features=1024, bias=False)
)
(lora_embedding_A): ParameterDict()
(lora_embedding_B): ParameterDict()
)
(out_proj): Linear(in_features=1024, out_features=1024, bias=True)
)
(activation_fn): ReLU()
(self_attn_layer_norm): LayerNorm((1024,), eps=1e-05, elementwise_affine=True)
(fc1): Linear(in_features=1024, out_features=4096, bias=True)
(fc2): Linear(in_features=4096, out_features=1024, bias=True)
(final_layer_norm): LayerNorm((1024,), eps=1e-05, elementwise_affine=True)
)
)
)
)
(lm_head): Linear(in_features=512, out_features=50272, bias=False)
)
)
)
使用peft_model.merge_and_unload()得到融合后的model1
2
3
4
5
6
7
8
9
10
11
12
13
14
15
16
17
18
19
20
21
22
23
24
25
26OPTForCausalLM(
(model): OPTModel(
(decoder): OPTDecoder(
(embed_tokens): Embedding(50272, 512, padding_idx=1)
(embed_positions): OPTLearnedPositionalEmbedding(2050, 1024)
(project_out): Linear(in_features=1024, out_features=512, bias=False)
(project_in): Linear(in_features=512, out_features=1024, bias=False)
(layers): ModuleList(
(0-23): 24 x OPTDecoderLayer(
(self_attn): OPTAttention(
(k_proj): Linear(in_features=1024, out_features=1024, bias=True)
(v_proj): Linear(in_features=1024, out_features=1024, bias=True)
(q_proj): Linear(in_features=1024, out_features=1024, bias=True)
(out_proj): Linear(in_features=1024, out_features=1024, bias=True)
)
(activation_fn): ReLU()
(self_attn_layer_norm): LayerNorm((1024,), eps=1e-05, elementwise_affine=True)
(fc1): Linear(in_features=1024, out_features=4096, bias=True)
(fc2): Linear(in_features=4096, out_features=1024, bias=True)
(final_layer_norm): LayerNorm((1024,), eps=1e-05, elementwise_affine=True)
)
)
)
)
(lm_head): Linear(in_features=512, out_features=50272, bias=False)
)
遇到的一些问题
- 数据集的处理,微调的template该如何写
找到的例子
14.fine-tuning-llama-2-7b-on-custom-dataset.ipynb - Colaboratory (google.com)
Fine_tuned_Llama_PEFT_QLora.ipynb - Colaboratory (google.com)
在训练时使用一个template1
2
3
4
5
6
7
8
9
10
11
12
13
14
15
16DEFAULT_SYSTEM_PROMPT = """
Below is a conversation between a human and an AI agent. Write a summary of the conversation.
""".strip()
def generate_training_prompt(
conversation: str, summary: str, system_prompt: str = DEFAULT_SYSTEM_PROMPT
) -> str:
return f"""### Instruction: {system_prompt}
### Input:
{conversation.strip()}
### Response:
{summary}
""".strip()
测试时1
2
3
4
5
6
7
8
9
10def generate_prompt(
conversation: str, system_prompt: str = DEFAULT_SYSTEM_PROMPT
) -> str:
return f"""### Instruction: {system_prompt}
### Input:
{conversation.strip()}
### Response:
""".strip()
训练后得到的model是peftmodel还是什么类型的模型
一种方法是
1 | repo_id = "meta-llama/Llama-2-7b-chat-hf" |
base_model是一个LlamaForCausalLM类,训练完后使用
trainer.save_model("Finetuned_adapter")保存模型,然后使用PeftModel.from_pretrained得到PeftModel1
2
3
4
5model = PeftModel.from_pretrained(
base_model,
"/content/Finetuned_adapter",
)
merged_model = model.merge_and_unload()
然后保存模型1
2merged_model.save_pretrained("/content/Merged_model")
tokenizer.save_pretrained("/content/Merged_model")
另一种是使用AutoPeftModelForCausalLM1
2
3
4
5
6
7
8
9
10from peft import AutoPeftModelForCausalLM
trained_model = AutoPeftModelForCausalLM.from_pretrained(
OUTPUT_DIR,
low_cpu_mem_usage=True,
)
merged_model = model.merge_and_unload()
merged_model.save_pretrained("merged_model", safe_serialization=True)
tokenizer.save_pretrained("merged_model")
参考资料
- Training Large Language Model (LLM) on your data | by Mohit Soni | Walmart Global Tech Blog | Aug, 2023 | Medium
- A Practical Introduction to LLMs | By: Shawhin Talebi | Towards Data Science
- The Ultimate Guide to LLM Fine Tuning: Best Practices & Tools | Lakera – Protecting AI teams that disrupt the world.
- tutorial https://learn.deeplearning.ai/finetuning-large-language-models
