目前深度学习的方法都是数据驱动的,在协同感知方面,数据集目前不算特别多,主要存在1)真实数据较少2)不同数据集之间配置差异较大,需要自行修改等.
协同感知数据集
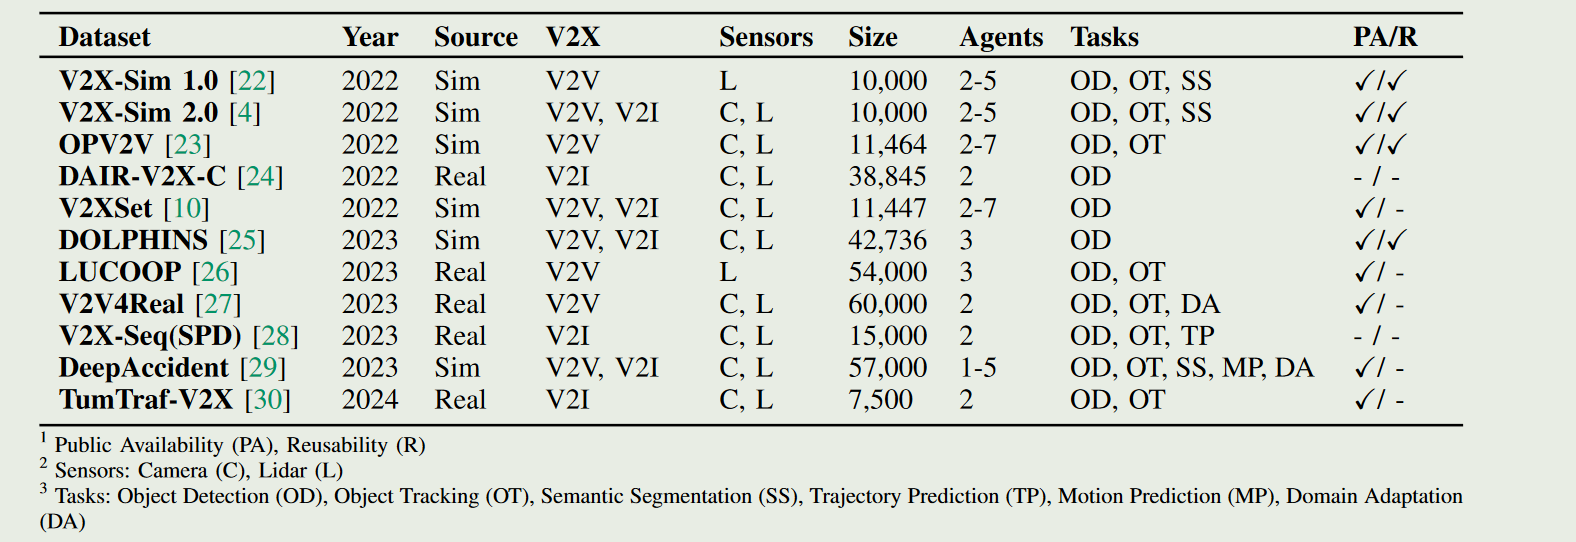
目前找到的数据集还是不少的.
OPV2V 2022
推出了首个大规模开放式车对车感知模拟数据集。该数据集包含 70 多个场景、11,464 个帧和 232,913 个注释三维车辆边界框,收集自 CARLA 的 8 个城镇和洛杉矶卡尔弗城的一个数字城镇。然后构建了一个包含 16 个实施模型的综合基准,以评估几种信息融合策略(即早期、后期和中间融合)与最先进的激光雷达检测算法。
V2XSet 2022
研究了如何应用 “车对物”(V2X)通信来提高自动驾驶汽车的感知性能。我们利用新颖的视觉转换器(Vision Transformer)提出了一个具有 V2X 通信功能的稳健合作感知框架。具体来说,我们建立了一个整体注意力模型,即 V2X-ViT,以有效融合道路代理(即车辆和基础设施)之间的信息。V2X-ViT 由异构多代理自我注意和多尺度窗口自我注意交替层组成,可捕捉代理间的交互和每个代理的空间关系。这些关键模块采用统一的 Transformer 架构设计,以应对常见的 V2X 挑战,包括异步信息共享、姿势错误和 V2X 组件的异构性。
车与道路 CARLA和OPENCDA创建的模拟数据集
DAIR-V2X 2022
为了加速车辆-基础设施协同自动驾驶(VICAD)的计算机视觉研究和创新,我们发布了 DAIR-V2X 数据集,这是首个用于 VICAD 的大规模、多模态、多视角真实场景数据集。
V2X-Sim 2022
车对物(V2X)通信技术实现了车辆与邻近环境中许多其他实体之间的协作,可以从根本上改善自动驾驶的感知系统。然而,公共数据集的缺乏极大地限制了协同感知的研究进展。为了填补这一空白,我们提出了 V2X-Sim—一个用于 V2X 辅助自动驾驶的综合模拟多代理感知数据集。V2XSim 提供:(1)来自路边装置(RSU)和多辆车的多代理传感器记录,可实现协同感知;(2)多模态传感器流,可促进多模态感知;以及(3)多种地面实况,可支持各种感知任务。同时,我们建立了一个开源测试平台,并在检测、跟踪和分割等三个任务上为最先进的协同感知算法提供了基准。V2X-Sim 试图在现实数据集广泛可用之前,促进自动驾驶的协同感知研究。
V2V4Real 2023
最近的研究表明,车对车(V2V)协同感知系统在彻底改变自动驾驶行业方面具有巨大潜力。然而,真实世界数据集的缺乏阻碍了这一领域的发展。为了促进协同感知的发展,我们提出了 V2V4Real,这是首个大规模真实世界多模态 V2V 感知数据集。
摘要
现代自动驾驶感知协同对于遮挡敏感并且缺乏长范围感知能力,这是阻碍五级自动驾驶的关键瓶颈之一.
最近的研究表明,车对车(V2V)协作感知系统具有彻底改变自动驾驶行业的巨大潜力。然而,缺乏真实世界的数据集阻碍了该领域的进步。为了促进合作感知的发展,我们提出了 V2V4Real,这是第一个用于 V2V 感知的大规模现实世界多模态数据集。这些数据是由两辆配备多模态传感器的车辆在不同场景中一起行驶收集的。我们的 V2V4Real 数据集覆盖了 410 公里的驾驶区域,包括 20K LiDAR 帧、40K RGB 帧、240K 5 个类别的带注释 3D 边界框以及覆盖所有驾驶路线的 HDMap。
自动驾驶技术在国际上有一个严格的分级标准,而美国交通部选择的是美国汽车工程师学会(Society of Automotive Engineers)给出的评定标准,其主要内容是:
0级:无自动驾驶,由人类驾驶员全权操控汽车,可以得到警告或干预系统的辅助;
1级:驾驶支援,通过驾驶环境对方向盘和加减速中的一项操作提供驾驶支持,其他的驾驶动作都由人类驾驶员进行操作;
2级:部分自动化,通过驾驶环境对方向盘和加减速中的多项操作提供驾驶支持,其他的驾驶动作都由人类驾驶员进行操作。
3级:有条件自动化,由自动驾驶系统完成所有的驾驶操作。根据系统要求,人类驾驶者需要在适当的时候提供应答。
4级:高度自动化,由自动驾驶系统完成所有的驾驶操作。根据系统要求,人类驾驶者不一定需要对所有的系统请求做出应答,包括限定道路和环境条件等。
5级:完全自动化,在所有人类驾驶者可以应付的道路和环境条件下,均可以由自动驾驶系统自主完成所有的驾驶操作。
V2V4Real 引入了三个感知任务,包括协作 3D 对象检测、协作 3D 对象跟踪和用于协作感知的 Sim2Real 域自适应。我们提供了近期协作感知算法在三个任务上的综合基准。 V2V4Real 数据集和代码库可以在 Research.seas.ucla.edu/mobility-lab/v2v4real 上找到。
我们收集了 19 个小时的 310K 帧的驾驶数据。我们手动选择最具代表性的 67 个场景,每个场景时长 10-20 秒。我们以 10Hz 的频率对帧进行采样,得到总共 20K 帧的 LiDAR 点云和 40K 帧的 RGB 图像。对于每个场景,我们确保两辆车传感器系统之间的异步小于 50 毫秒。所有场景都与包含可行驶区域、道路边界以及虚线的地图对齐。
- 协作者的相对位姿存在不可避免的误差,这在将数据转换到统一坐标系时会产生全局错位。
- 协作者的传感器测量通常不同步,这是由不同传感器系统的异步以及数据传输过程中的通信延迟造成的
- 典型的V2V通信技术需要有限的带宽,这限制了传输数据的大小[31,40,49]。因此,协作检测算法必须考虑精度和带宽要求之间的权衡
训练细节.对于所有三个任务,数据集分为训练/验证/测试集,分别具有 14,210/2,000/3,986 帧。所有检测模型均采用 PointPillar 作为骨干从点云中提取 2D 特征。我们用 60 个 epoch 训练所有模型,每个 GPU (RTX3090) 的批量大小为 4,学习率为 0.001,并通过余弦退火来衰减学习率。早期停止用于寻找最佳时期。我们还为所有实验添加了正常的点云数据增强,包括缩放、旋转和翻转。我们使用权重衰减为 1×10⁻² 的 AdamW来优化我们的模型。对于跟踪任务,我们将前 3 帧和当前帧一起作为输入.
RCooper 2024
近年来,路侧感知的价值逐渐凸显并得到认可,它可以延伸自动驾驶和交通管理的边界。
然而,现有的路侧感知方法仅针对单一基础设施的传感器系统,由于感知范围和盲区的限制,无法实现对交通区域的全面理解。面向高质量的路侧感知,我们需要路侧协同感知( Roadside Cooperative Perception,RCooper )来实现面向受限交通区域的实际区域覆盖路侧感知。Rcooper有其特定领域的挑战,但由于缺乏数据集而阻碍了进一步的探索。

因此,我们发布了第一个真实世界的大规模RCooper数据集,以启动对实际路边协作感知的研究,包括检测和跟踪。人工标注的数据集包括50k幅图像和30k个点云,其中包含两个具有代表性的交通场景(即,交叉口和走廊)。所构建的基准证明了路侧合作感知的有效性,并展示了进一步研究的方向。
TUMTraf-V2X 2024
TUMTraf V2X Cooperative Perception Dataset (tum-traffic-dataset.github.io)
协作感知为增强自动驾驶车辆的能力和改善道路安全提供了许多好处。除了车载传感器外,使用路边传感器增加了可靠性,并扩展了传感器的范围。
数据集包含2,000个标记点云和5,000张来自5个路侧和4个机载传感器的标记图像。它包括30k个带有轨道ID和精确的GPS和IMU数据的3D盒子。标注了八个类别,涵盖了具有挑战性的驾驶操作的遮挡场景,如交通违规、接近失误事件、超车和掉头。
V2X-Real 2024
V2X-real | Jiaqi Ma | UCLA Mobility Lab
近年来,随着车联网( Vehicle-to-Ething,V2X )技术的发展,自动驾驶车辆能够共享感知信息以穿透遮挡,极大地提升了感知能力。
在本文中,我们提出了一个同时具有多种车辆和智能基础设施的混合数据集,以促进具有多模态感知数据的V2X协作感知开发。我们的V2X - Real使用两个连接的自动化车辆和两个智能基础设施进行采集,这些基础设施都配备了包括激光雷达传感器和多视角相机在内的多模态传感器。
整个数据集包含33K个LiDAR帧和171K个相机数据,在非常具有挑战性的城市场景中,有超过1.2 M的10个类别的注释边界框。根据协作模式和自我视角,我们推导出车辆中心、基础设施中心、车辆到车辆和基础设施到基础设施协作感知的四类数据集。 主要是包含了I2I的场景.
上面三个数据集都是V2X的真实环境数据
CodeBase
我常用的就是OpenCOOD ICRA 2022] An opensource framework for cooperative detection. Official implementation for OPV2V. (github.com)的代码库,但也有其他看起来还行的,包括:
- CVPR2023 Highlight] The official codebase for paper “V2V4Real: A large-scale real-world dataset for Vehicle-to-Vehicle Cooperative Perception” (github.com)
- ICLR2024] HEAL: An Extensible Framework for Open Heterogeneous Collaborative Perception ➡️ All You Need for Multi-Modality Collaborative Perception! (github.com)
- ICRA2023] CoAlign: Robust Collaborative 3D Object Detection in Presence of Pose Errors (github.com)
- AIR-THU/DAIR-V2X (github.com)
- coperception/coperception: An SDK for multi-agent collaborative perception. (github.com) 这个仓库代码其实不太行 😅
这里对其中一些代码做简单介绍.
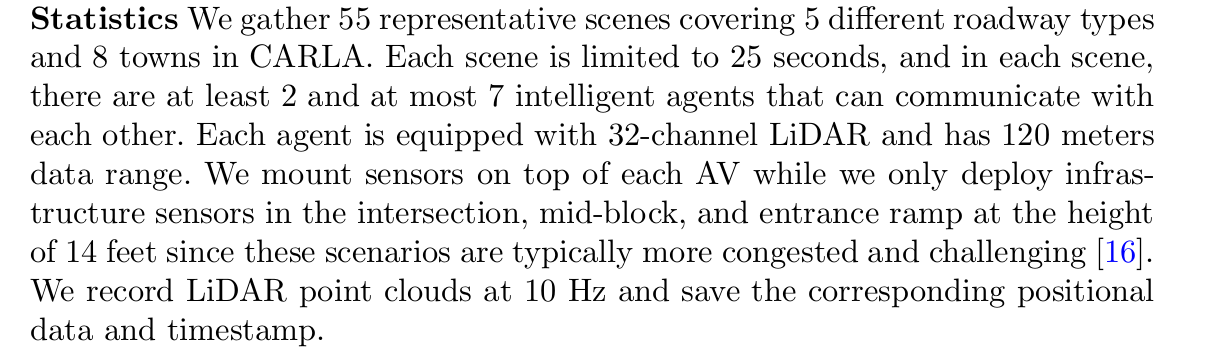
BaseDataset
不同时期不同类型数据进行融合的父类.数据中通过idx得到对应的场景中数据
这个类会根据配置添加噪声并设置max_cav,添加root_dir中的文件夹scenario_folders.1
2
3
4
5
6
7
8
9
10
11
12
13
14
15
16
17
18
19
20
21
22
23
24if 'wild_setting' in params:
self.seed = params['wild_setting']['seed']
# whether to add time delay
self.async_flag = params['wild_setting']['async']
self.async_mode = \
'sim' if 'async_mode' not in params['wild_setting'] \
else params['wild_setting']['async_mode']
self.async_overhead = params['wild_setting']['async_overhead']
# localization error
self.loc_err_flag = params['wild_setting']['loc_err']
self.xyz_noise_std = params['wild_setting']['xyz_std']
self.ryp_noise_std = params['wild_setting']['ryp_std']
# transmission data size
self.data_size = \
params['wild_setting']['data_size'] \
if 'data_size' in params['wild_setting'] else 0
self.transmission_speed = \
params['wild_setting']['transmission_speed'] \
if 'transmission_speed' in params['wild_setting'] else 27
self.backbone_delay = \
params['wild_setting']['backbone_delay'] \
if 'backbone_delay' in params['wild_setting'] else 0
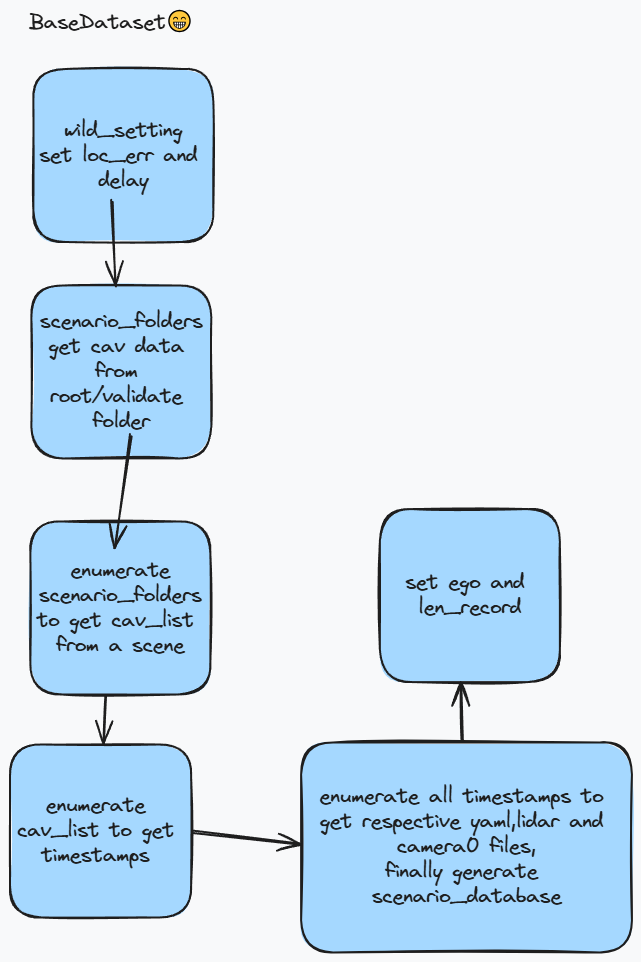
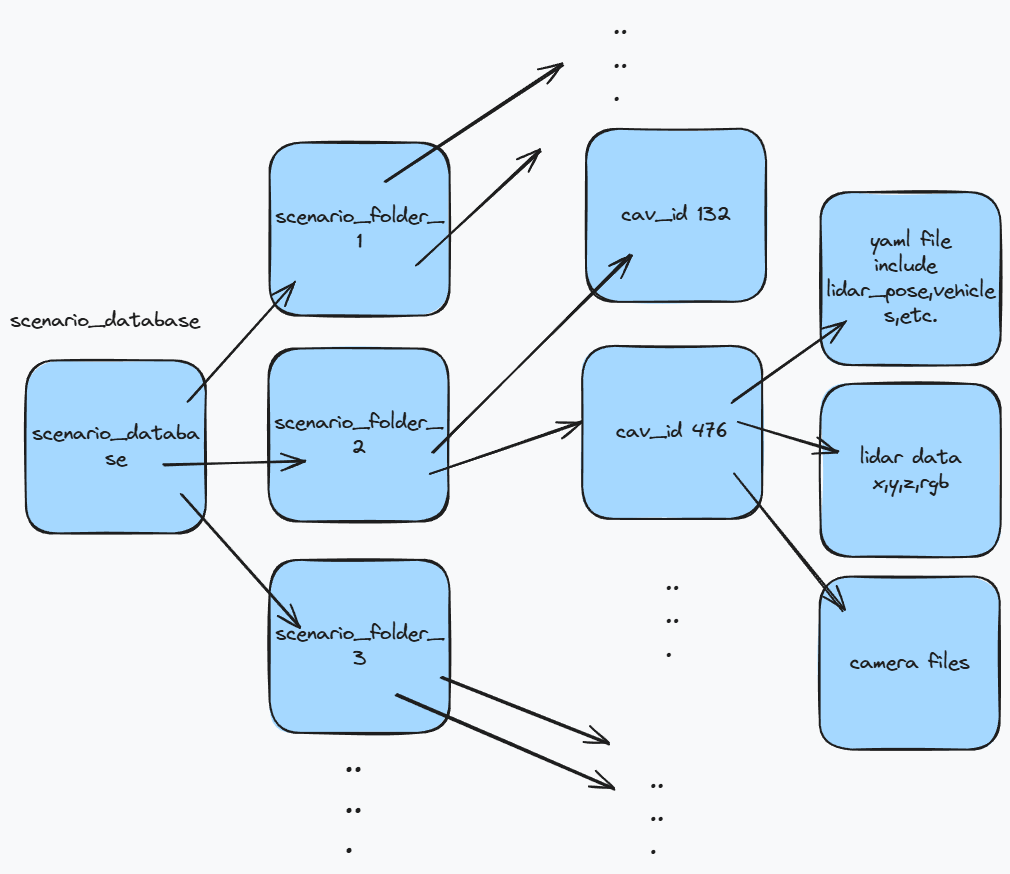
遍历每个场景文件夹,每个场景对应scenario_database,每个场景下有若干agent,如果其中的infra在第一个,那就放在最后.对场景中所有agent遍历,如果多余max_cav跳出.
scenario_database中的一个场景的每个agent对应一个有序字典,然后读取对应的yaml和pcd文件. 一个场景下有多个时间点(timestamp),每个时间点上有许多数据,包括lidar,camera. 将第一个代理作为ego,设置其ego值为True并在len_record上添加对应的时间节点(一个场景的时间长度就是一个场景中采样了多少个时间点),其余代理ego属性设置为False. 这就是BaseData的初始化过程,它的其他类会用于子类进行调用.1
2
3
4
5
6
7
8
9
10
11
12
13
14
15
16
17
18
19
20
21
22
23
24
25
26
27
28
29for timestamp in timestamps:
self.scenario_database[i][cav_id][timestamp] = \
OrderedDict()
yaml_file = os.path.join(cav_path,
timestamp + '.yaml')
lidar_file = os.path.join(cav_path,
timestamp + '.pcd')
camera_files = self.load_camera_files(cav_path, timestamp)
self.scenario_database[i][cav_id][timestamp]['yaml'] = \
yaml_file
self.scenario_database[i][cav_id][timestamp]['lidar'] = \
lidar_file
self.scenario_database[i][cav_id][timestamp]['camera0'] = \
camera_files
# Assume all cavs will have the same timestamps length. Thus
# we only need to calculate for the first vehicle in the
# scene.
if j == 0:
# we regard the agent with the minimum id as the ego
self.scenario_database[i][cav_id]['ego'] = True
if not self.len_record:
self.len_record.append(len(timestamps))
else:
prev_last = self.len_record[-1]
self.len_record.append(prev_last + len(timestamps))
else:
self.scenario_database[i][cav_id]['ego'] = False
BaseDataset有collate_batch_train,用于dataloader将多个batch进行处理.它会将每个batch中的数据放在一起,并将processed_lidar_list从一个长度为batch_size的每个元素为一个dict的列表转为一个dict,dict中每个value是一个np array,并将lable_dict转为如下1
2
3{'targets': targets,
'pos_equal_one': pos_equal_one,
'neg_equal_one': neg_equal_one}1
2
3
4
5
6
7
8
9
10
11
12
13
14
15
16
17
18
19
20
21
22for i in range(len(batch)):
ego_dict = batch[i]['ego']
object_bbx_center.append(ego_dict['object_bbx_center'])
object_bbx_mask.append(ego_dict['object_bbx_mask'])
processed_lidar_list.append(ego_dict['processed_lidar'])
label_dict_list.append(ego_dict['label_dict'])
if self.visualize:
origin_lidar.append(ego_dict['origin_lidar'])
# convert to numpy, (B, max_num, 7)
object_bbx_center = torch.from_numpy(np.array(object_bbx_center))
object_bbx_mask = torch.from_numpy(np.array(object_bbx_mask))
processed_lidar_torch_dict = \
self.pre_processor.collate_batch(processed_lidar_list)
label_torch_dict = \
self.post_processor.collate_batch(label_dict_list)
output_dict['ego'].update({'object_bbx_center': object_bbx_center,
'object_bbx_mask': object_bbx_mask,
'processed_lidar': processed_lidar_torch_dict,
'label_dict': label_torch_dict})
不同数据类型融合
早期融合
早期融合时每个代理直接传递点云数据,预处理步骤在ego代理.
子类在初始化时都会构建preprocessor和postprocessor.在`__get_item中拿到每个数据. 首先会调用retrieve_base_data`,这就是父类的方法.根据传入的idx,从len_record中得到对应的scenario_index,从self.scenario_database列表中得到对应的scenario_database,其包括这个场景下所有的代理以及每个代理在每个timestamp下的yaml,lidar,camera0文件. 然后根据scenario_index获得timestamp_index,也就是在某个场景下的相对于这个场景的timestamp_index.1
2
3
4
5
6
7
8
9
10
11
12
13scenario_index = 0
for i, ele in enumerate(self.len_record):
if idx < ele:
scenario_index = i
break
scenario_database = self.scenario_database[scenario_index]
# check the timestamp index
timestamp_index = idx if scenario_index == 0 else \
idx - self.len_record[scenario_index - 1]
# retrieve the corresponding timestamp key
timestamp_key = self.return_timestamp_key(scenario_database,
timestamp_index)
接着计算每个代理与ego代理的相对距离,首先遍历上面拿到的scenario_database拿到ego代理的数据,也就输它的yaml文件中的lidar_pose,分别表示代理的x,y,z,yaw,roll,pitch数据.然后更新了所有代理的cav_content,增加了distance_to_ego,然后遍历scenario_database,copy cav_content[‘ego’],计算delay,如果是ego就没有delay,否则根据配置信息,如果async_mode是real,从0-async_overhead均匀分布采样一个值得到一个时间加上data_size/speed的延迟.如果是sim就直接取async_overhead.如果async_flag是false就是0.1
2
3
4
5
6
7
8
9
10
11
12
13
14
15
16
17
18
19
20
21
22
23
24
25
26
27
28def calc_dist_to_ego(self, scenario_database, timestamp_key):
"""
Calculate the distance to ego for each cav.
"""
ego_lidar_pose = None
ego_cav_content = None
# Find ego pose first
for cav_id, cav_content in scenario_database.items():
if cav_content['ego']:
ego_cav_content = cav_content
ego_lidar_pose = \
load_yaml(cav_content[timestamp_key]['yaml'])['lidar_pose']
break
assert ego_lidar_pose is not None
# calculate the distance
for cav_id, cav_content in scenario_database.items():
cur_lidar_pose = \
load_yaml(cav_content[timestamp_key]['yaml'])['lidar_pose']
distance = \
math.sqrt((cur_lidar_pose[0] -
ego_lidar_pose[0]) ** 2 +
(cur_lidar_pose[1] - ego_lidar_pose[1]) ** 2)
cav_content['distance_to_ego'] = distance
scenario_database.update({cav_id: cav_content})
return ego_cav_content
计算出timestamp_delay之后根据延迟时间计算应该获取数据的timestamp并更新cav的time_delay. 然后进行数据转换1
2
3
4
5
6
7
8
9
10
11
12
13
14
15
16
17
18
19
20
21
22
23
24
25
26data = OrderedDict()
# load files for all CAVs
for cav_id, cav_content in scenario_database.items():
data[cav_id] = OrderedDict()
data[cav_id]['ego'] = cav_content['ego']
# calculate delay for this vehicle
timestamp_delay = \
self.time_delay_calculation(cav_content['ego'])
if timestamp_index - timestamp_delay <= 0:
timestamp_delay = timestamp_index
timestamp_index_delay = max(0, timestamp_index - timestamp_delay)
timestamp_key_delay = self.return_timestamp_key(scenario_database,
timestamp_index_delay)
# add time delay to vehicle parameters
data[cav_id]['time_delay'] = timestamp_delay
# load the corresponding data into the dictionary
data[cav_id]['params'] = self.reform_param(cav_content,
ego_cav_content,
timestamp_key,
timestamp_key_delay,
cur_ego_pose_flag)
data[cav_id]['lidar_np'] = \
pcd_utils.pcd_to_np(cav_content[timestamp_key_delay]['lidar'])
return data
根据cav_content,ego_content,timestamp_key以及delay时的key,还有一个cur_ego_pose_flag表示是否似乎用当前的ego位姿计算transformation matrix.
首先分别拿到cav、ego的yaml数据,以及延迟时的数据,如果不是ego代理并且设置了loc_err就加上噪声.如果设置了cur_ego_pose_flag为True,计算transformation_matrix
计算方式如下,就是将x1在6Dof下转换到x2. transformation_matrix其实就是延迟的cav数据转换到现在的ego数据上的转换矩阵. 这个矩阵无非是一个转换关系,spatial_correction_matrix是相等转换. 如果不使用现在的ego位姿,transformation_matrix就是延迟的cav位姿到延迟的ego位姿,此外spatial_correction_matrix需要负责将延迟的ego位姿转换到现在的ego位姿. 这些矩阵转换可以用来转换点云. 此外需要计算现在的cav到ego的位姿转换用于后期融合,将得到的其他cav的检测框转换到ego坐标系下.1
2
3
4
5# This is only used for late fusion, as it did the transformation
# in the postprocess, so we want the gt object transformation use
# the correct one
gt_transformation_matrix = x1_to_x2(cur_cav_lidar_pose,
cur_ego_lidar_pose)1
2
3
4
5
6
7
8
9
10
11
12
13
14
15
16
17
18
19
20
21
22
23
24
25
26
27
28
29
30
31
32
33
34
35
36
37
38
39
40
41
42
43def x_to_world(pose):
x, y, z, roll, yaw, pitch = pose[:]
# used for rotation matrix
c_y = np.cos(np.radians(yaw))
s_y = np.sin(np.radians(yaw))
c_r = np.cos(np.radians(roll))
s_r = np.sin(np.radians(roll))
c_p = np.cos(np.radians(pitch))
s_p = np.sin(np.radians(pitch))
matrix = np.identity(4)
# translation matrix
matrix[0, 3] = x
matrix[1, 3] = y
matrix[2, 3] = z
# rotation matrix
matrix[0, 0] = c_p * c_y
matrix[0, 1] = c_y * s_p * s_r - s_y * c_r
matrix[0, 2] = -c_y * s_p * c_r - s_y * s_r
matrix[1, 0] = s_y * c_p
matrix[1, 1] = s_y * s_p * s_r + c_y * c_r
matrix[1, 2] = -s_y * s_p * c_r + c_y * s_r
matrix[2, 0] = s_p
matrix[2, 1] = -c_p * s_r
matrix[2, 2] = c_p * c_r
return matrix
def x1_to_x2(x1, x2):
x1 : list
The pose of x1 under world coordinates.
x2 : list
The pose of x2 under world coordinates.
Returns
-------
transformation_matrix : np.ndarray
The transformation matrix.
"""
x1_to_world = x_to_world(x1)
x2_to_world = x_to_world(x2)
world_to_x2 = np.linalg.inv(x2_to_world)
transformation_matrix = np.dot(world_to_x2, x1_to_world)
return transformation_matrix
然后把上面数据存在delay_params中1
2
3
4
5
6# we always use current timestamp's gt bbx to gain a fair evaluation
delay_params['vehicles'] = cur_params['vehicles'] #周围cav的数据
delay_params['transformation_matrix'] = transformation_matrix
delay_params['gt_transformation_matrix'] = \
gt_transformation_matrix
delay_params['spatial_correction_matrix'] = spatial_correction_matrix
然后得到lidar点云数据lidar_np,只使用点云的第一个通道的值1
2
3
4
5
6
7
8def pcd_to_np(pcd_file):
pcd = o3d.io.read_point_cloud(pcd_file)
xyz = np.asarray(pcd.points)
# we save the intensity in the first channel
intensity = np.expand_dims(np.asarray(pcd.colors)[:, 0], -1)
pcd_np = np.hstack((xyz, intensity))
return np.asarray(pcd_np, dtype=np.float32)
# shape like (56423, 4)
这下终于有了base_data_dict,其包括这个场景下的一个timestamp的所有代理的延迟time_delay,params(包括转换矩阵和vehicles)以及lidar数据(numpy类型).
然后再遍历base_data拿到ego_id,然后再遍历排除距离大于某个值的代理,再获取那个代理的信息1
2
3
4
5
6
7
8
9
10
11
12
13
14
15
16
17
18
19
20for cav_id, selected_cav_base in base_data_dict.items():
# check if the cav is within the communication range with ego
distance = \
math.sqrt((selected_cav_base['params']['lidar_pose'][0] -
ego_lidar_pose[0]) ** 2 + (
selected_cav_base['params'][
'lidar_pose'][1] - ego_lidar_pose[
1]) ** 2)
if distance > opencood.data_utils.datasets.COM_RANGE:
continue
selected_cav_processed = self.get_item_single_car(
selected_cav_base,
ego_lidar_pose)
# all these lidar and object coordinates are projected to ego
# already.
projected_lidar_stack.append(
selected_cav_processed['projected_lidar'])
object_stack.append(selected_cav_processed['object_bbx_center'])
object_id_stack += selected_cav_processed['object_ids']
根据ego_pose,计算transformation_matrix,根据后处理器生成物体中心 ,利用project_world_objects将物体在世界坐标系投影到ego坐标系中,每个物体位姿计算如下,这里的每个物体都是每个代理的周围代理vehicles(surrounding vehicles that have at least one LiDAR point hit from the agent),将周围的车的lidar投影到ego上.1
2
3
4
5
6
7
8
9location = object_content['location']# 世界坐标系下frontal axis中心的坐标
rotation = object_content['angle']# roll,yaw,pitch 世界坐标系
center = object_content['center'] # bbx中心相对于frontal axis中心位置偏离
extent = object_content['extent']# half length,width and height
object_pose = [location[0] + center[0],
location[1] + center[1],
location[2] + center[2],
rotation[0], rotation[1], rotation[2]]
所以其实就是同个场景下所有被lidar打到的周围车辆放在了output_dict,根据配置max_num(最多的anchors)数,遍历output_dict将物体坐标存到object_np中,以及mask和物体的id得到object_bbx_center, object_bbx_mask, object_ids.1
2
3
4
5
6
7
8object_np = np.zeros((self.params['max_num'], 7))
mask = np.zeros(self.params['max_num'])
object_ids = []
for i, (object_id, object_bbx) in enumerate(output_dict.items()):
object_np[i] = object_bbx[0, :] # object_bbx [1,7]
mask[i] = 1
object_ids.append(object_id)
然后进行random打乱以及mask掉打到自己的点.最后将点云投射到ego坐标系中.最后返回这个代理检测到的代理的坐标(N,7),检测到的代理id以及经过投影的点云.1
2
3
4selected_cav_processed.update(
{'object_bbx_center': object_bbx_center[object_bbx_mask == 1],
'object_ids': object_ids,
'projected_lidar': lidar_np})
然后在遍历场景下所有代理的过程中,把这些数据加入列表,然后把目标物体去重,更新物体坐标和mask的列表.1
2
3
4
5
6
7
8
9
10
11
12
13
14
15 projected_lidar_stack.append(
selected_cav_processed['projected_lidar'])
object_stack.append(selected_cav_processed['object_bbx_center'])
object_id_stack += selected_cav_processed['object_ids']
# exclude all repetitive objects
unique_indices = \
[object_id_stack.index(x) for x in set(object_id_stack)]
object_stack = np.vstack(object_stack)
object_stack = object_stack[unique_indices]
# make sure bounding boxes across all frames have the same number
object_bbx_center = \
np.zeros((self.params['postprocess']['max_num'], 7))
mask = np.zeros(self.params['postprocess']['max_num'])
object_bbx_center[:object_stack.shape[0], :] = object_stack
mask[:object_stack.shape[0]] = 1
接着做点云做增强,包括flip,rotation和scale.然后去掉范围外的点云以及去掉在外面的bbox. 然后根据点云预处理得到体素,假设通过spvoxel预处理1
2
3
4
5
6
7
8
9
10
11# pre-process the lidar to voxel/bev/downsampled lidar
lidar_dict = self.pre_processor.preprocess(projected_lidar_stack)
# generate the anchor boxes
anchor_box = self.post_processor.generate_anchor_box()
# generate targets label
label_dict = \
self.post_processor.generate_label(
gt_box_center=object_bbx_center,
anchors=anchor_box,
mask=mask)1
2
3
4
5
6
7
8
9
10
11
12args:
max_points_per_voxel: 32
max_voxel_test: 70000
max_voxel_train: 32000
voxel_size: [0.4,0.4,4]
cav_lidar_range:
- -140.8
- -38.4
- -3
- 140.8
- 38.4
- 11
2
3data_dict['voxel_features'] = voxels
data_dict['voxel_coords'] = coordinates
data_dict['voxel_num_points'] = num_points
得到特征,坐标和每个体素内的点云数.
然后通过generate_anchor_box得到anchor,generate_label生成label.通过配置知道anchor的长宽高,每个anchor是grid的倍数,一个grid就lidar_range/voxel_size. 每个位置的两个anchor长宽高固定,但是yaw反向. 生成label就要复杂一些了,需要知道anchor_box和box_center以及mask.1
2
3
4
5
6
7
8
9
10
11
12
13
14
15
16
17
18
19
20
21
22
23
24
25
26
27
28
29
30
31# (max_num, 7)
gt_box_center = kwargs['gt_box_center']
# (H, W, anchor_num, 7)
anchors = kwargs['anchors']
# (max_num)
masks = kwargs['mask']
# (H, W)
feature_map_shape = anchors.shape[:2]
# (H*W*anchor_num, 7)
anchors = anchors.reshape(-1, 7)
# normalization factor, (H * W * anchor_num)
# 计算anchor的长宽对角线长度
anchors_d = np.sqrt(anchors[:, 4] ** 2 + anchors[:, 5] ** 2)
# (H, W, 2)
pos_equal_one = np.zeros((*feature_map_shape, self.anchor_num))
neg_equal_one = np.zeros((*feature_map_shape, self.anchor_num))
# (H, W, self.anchor_num * 7) bbox 回归结果
targets = np.zeros((*feature_map_shape, self.anchor_num * 7))
# (n, 7)
gt_box_center_valid = gt_box_center[masks == 1]
# (n, 8, 3)
gt_box_corner_valid = \
box_utils.boxes_to_corners_3d(gt_box_center_valid,
self.params['order'])
# (H*W*anchor_num, 8, 3)
anchors_corner = \
box_utils.boxes_to_corners_3d(anchors,
order=self.params['order'])
将gt_box和anchor_box从7转为8,然后转为二维box,忽略z轴,后面求overlaps用cython写的,它会求出每个anchor_box对每个gt_box的iou score,然后得到对于每个gt_box,iou最高的anchor box的索引. 然后根据iou的值得到id_pos和id_neg.1
2
3
4
5
6
7
8
9
10
11
12
13
14
15
16
17
18
19
20
21
22
23
24
25
26
27
28
29
30
31
32
33
34
35# (H*W*anchor_num, 4)
anchors_standup_2d = \
box_utils.corner2d_to_standup_box(anchors_corner)
# (n, 4)
gt_standup_2d = \
box_utils.corner2d_to_standup_box(gt_box_corner_valid)
# (H*W*anchor_n)
iou = bbox_overlaps(
np.ascontiguousarray(anchors_standup_2d).astype(np.float32),
np.ascontiguousarray(gt_standup_2d).astype(np.float32),
)
# the anchor boxes has the largest iou across
# shape: (n)
id_highest = np.argmax(iou.T, axis=1)
# [0, 1, 2, ..., n-1]
id_highest_gt = np.arange(iou.T.shape[0])
# make sure all highest iou is larger than 0
mask = iou.T[id_highest_gt, id_highest] > 0
id_highest, id_highest_gt = id_highest[mask], id_highest_gt[mask]
# find anchors iou > params['pos_iou']
id_pos, id_pos_gt = \
np.where(iou >
self.params['target_args']['pos_threshold'])
# find anchors iou < params['neg_iou']
id_neg = np.where(np.sum(iou <
self.params['target_args']['neg_threshold'],
axis=1) == iou.shape[1])[0]
id_pos = np.concatenate([id_pos, id_highest])
id_pos_gt = np.concatenate([id_pos_gt, id_highest_gt])
id_pos, index = np.unique(id_pos, return_index=True)
id_pos_gt = id_pos_gt[index]
id_neg.sort()
然后计算需要回归的gt值,下面的值就是计算损失时的真值,包含七个值,针对anchor_box的中心三维坐标和长宽高以及yaw.
1 | # calculate the targets |
neg_label设置1
2
3
4
5
6
7
8index_x, index_y, index_z = np.unravel_index(
id_neg, (*feature_map_shape, self.anchor_num))
neg_equal_one[index_x, index_y, index_z] = 1
# to avoid a box be pos/neg in the same time
index_x, index_y, index_z = np.unravel_index(
id_highest, (*feature_map_shape, self.anchor_num))
neg_equal_one[index_x, index_y, index_z] = 0
最后得到了三个数组 projected_lidar_stack,object_stack ,object_id_stack.分别是通过project_world_objects得到的bbx的中心,物体id以及lidar数据(投影到ego坐标系上),1
2
3
4
5
6
7
8
9
10
11processed_data_dict['ego'].update(
{'object_bbx_center': object_bbx_center,
'object_bbx_mask': mask,
'object_ids': [object_id_stack[i] for i in unique_indices],
'anchor_box': anchor_box,
'processed_lidar': lidar_dict,
'label_dict': label_dict})
if self.visualize:
processed_data_dict['ego'].update({'origin_lidar':
projected_lidar_stack})
得到的processed_data_dict在ego键上有gt_box,anchor_box,label以及lidar的数据,如果要可视化,还可以拿到projected_lidar_stack也就是通过体素预处理之前的点云数据(N,4)
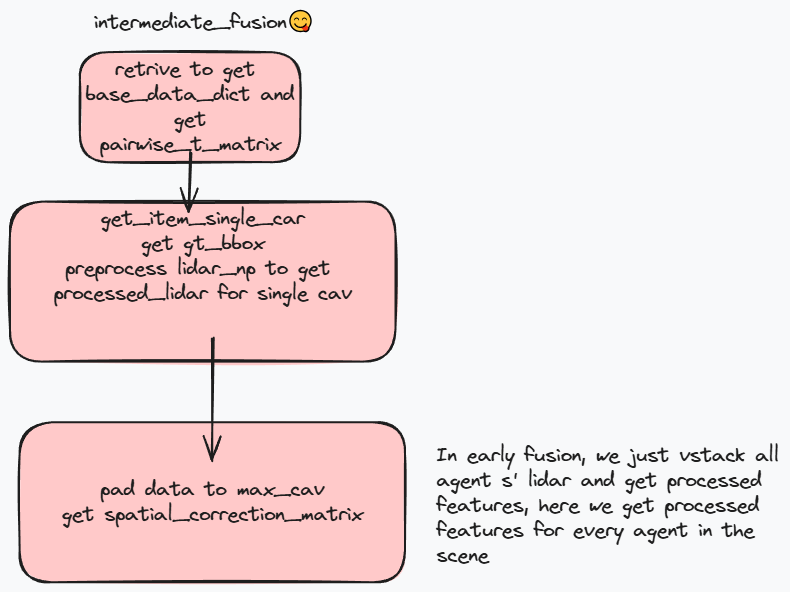
中期融合
中期融合时每个代理会对点云进行处理,传输处理后的特征.
中间融合会设置proj_first,使得先将其他代理的点云投射到ego坐标系上. 在获取数据时同样根据retrieve_base_data得到base_data_dict,获得pairwise_t_matrix,它表示代理i到代理j的转换矩阵. 然后年后依然是遍历base_data_dict(也就是通过retrieve_base_data得到的一个场景下的一个timestamp下的所有cav的数据). 然后在get_item_single_car中得到object_center,跟早期融合相同,根据transformation_matrix将其他代理点云投影到ego坐标系中(在此之前依旧有shuffle和mask). 然后将点云经过预处理,这里就是跟早期融合的差别,在每个代理上就进行了处理,得到processed_lidar,lidar_up依旧是点云1
2
3
4
5
6
7
8
9
10
11
12
13
14
15
16
17
18
19
20
21
22
23
24
25
26
27
28
29
30
31
32
33
34transformation_matrix = \
selected_cav_base['params']['transformation_matrix']
# retrieve objects under ego coordinates
object_bbx_center, object_bbx_mask, object_ids = \
self.post_processor.generate_object_center([selected_cav_base],
ego_pose)
# filter lidar
lidar_np = selected_cav_base['lidar_np']
lidar_np = shuffle_points(lidar_np)
# remove points that hit itself
lidar_np = mask_ego_points(lidar_np)
# project the lidar to ego space
if self.proj_first:
lidar_np[:, :3] = \
box_utils.project_points_by_matrix_torch(lidar_np[:, :3],
transformation_matrix)
lidar_np = mask_points_by_range(lidar_np,
self.params['preprocess'][
'cav_lidar_range'])
processed_lidar = self.pre_processor.preprocess(lidar_np)
# velocity
velocity = selected_cav_base['params']['ego_speed']
# normalize veloccity by average speed 30 km/h
velocity = velocity / 30
selected_cav_processed.update(
{'object_bbx_center': object_bbx_center[object_bbx_mask == 1],
'object_ids': object_ids,
'projected_lidar': lidar_np,
'processed_features': processed_lidar,
'velocity': velocity})
遍历所有base_data_dict,拿到bbx_center,ids,processed_features,等,此外还有spatial_correction_matrix,这是cur_ego_pose_flag为False时用来修正时延的. 因为processed_features是一个字典包括多个字段,同个场景中每个代理都有一个processed_features,要将所有代理的processed_features放在一个字典下,然后将其他数据补全,1
2
3
4
5
6
7
8
9
10
11
12
13
14
15
16
17
18
19
20
21
22
23
24
25
26
27
28
29
30
31
32
33
34
35
36
37
38
39
40
41
42
43# merge preprocessed features from different cavs into the same dict
cav_num = len(processed_features)
merged_feature_dict = self.merge_features_to_dict(processed_features)
# generate the anchor boxes
anchor_box = self.post_processor.generate_anchor_box()
# generate targets label
label_dict = \
self.post_processor.generate_label(
gt_box_center=object_bbx_center,
anchors=anchor_box,
mask=mask)
# pad dv, dt, infra to max_cav
velocity = velocity + (self.max_cav - len(velocity)) * [0.]
time_delay = time_delay + (self.max_cav - len(time_delay)) * [0.]
infra = infra + (self.max_cav - len(infra)) * [0.]
spatial_correction_matrix = np.stack(spatial_correction_matrix)
padding_eye = np.tile(np.eye(4)[None],(self.max_cav - len(
spatial_correction_matrix),1,1))
spatial_correction_matrix = np.concatenate([spatial_correction_matrix,
padding_eye], axis=0)
processed_data_dict['ego'].update(
{'object_bbx_center': object_bbx_center,
'object_bbx_mask': mask,
'object_ids': [object_id_stack[i] for i in unique_indices],
'anchor_box': anchor_box,
'processed_lidar': merged_feature_dict,
'label_dict': label_dict,
'cav_num': cav_num,
'velocity': velocity,
'time_delay': time_delay,
'infra': infra,
'spatial_correction_matrix': spatial_correction_matrix,
'pairwise_t_matrix': pairwise_t_matrix})
if self.visualize:
processed_data_dict['ego'].update({'origin_lidar':
np.vstack(
projected_lidar_stack)})
return processed_data_dict
晚期融合
晚期融合用于在每个代理上检测得到confidence(N,anchor_num)和regression(N,anchor_num*7)结果然后再传给ego代理,其往往会利用bbox进行nms. 因为晚期融合传送的数据快,
在代码中首先通过retrice_base_data得到这个场景下某个timestamp的所有cav的数据,在训练时从数据集中随即返回一个数据,得到这个数据的lidar_np,object_center,1
2
3
4
5
6
7
8
9
10
11
12
13
14
15def get_item_train(self, base_data_dict):
processed_data_dict = OrderedDict()
# during training, we return a random cav's data
if not self.visualize:
selected_cav_id, selected_cav_base = \
random.choice(list(base_data_dict.items()))
else:
selected_cav_id, selected_cav_base = \
list(base_data_dict.items())[0]
selected_cav_processed = self.get_item_single_car(selected_cav_base)
processed_data_dict.update({'ego': selected_cav_processed})
return processed_data_dict
因为
V2V4
相对来说增加了domain adaptation
常用工具类
从(N,C,H,W)也就是多个batch的cav数据放在一起,但是后面需要处理每个batch的数据,就通过regroup得到.1
2
3
4
5
6
7
8
9
10
11
12
13
14
15
16
17
18
19
20
21
22
23
24
25
26
27
28
29
30
31
32
33
34
35
36
37
38
39
40
41
42
43
44
45
46
47
48
49
50
51
52
53
54
55def regroup(dense_feature, record_len, max_len):
"""
Regroup the data based on the record_len.
Parameters
----------
dense_feature : torch.Tensor
N, C, H, W
record_len : list
[sample1_len, sample2_len, ...]
max_len : int
Maximum cav number
Returns
-------
regroup_feature : torch.Tensor
B, L, C, H, W
"""
cum_sum_len = list(np.cumsum(torch_tensor_to_numpy(record_len)))
# [sample1_len, sample2_len+sample1_len, ...]
split_features = torch.tensor_split(dense_feature,
cum_sum_len[:-1])
# 利用tensor_split划分每个batch的数据得到list
regroup_features = []
mask = []
for split_feature in split_features:
# M, C, H, W
feature_shape = split_feature.shape
# the maximum M is 5 as most 5 cavs
padding_len = max_len - feature_shape[0]
mask.append([1] * feature_shape[0] + [0] * padding_len)
padding_tensor = torch.zeros(padding_len, feature_shape[1],
feature_shape[2], feature_shape[3])
padding_tensor = padding_tensor.to(split_feature.device)
split_feature = torch.cat([split_feature, padding_tensor],
dim=0)
# 1, 5C, H, W
split_feature = split_feature.view(-1,
feature_shape[2],
feature_shape[3]).unsqueeze(0)
regroup_features.append(split_feature)
# B, 5C, H, W
regroup_features = torch.cat(regroup_features, dim=0)
# B, L, C, H, W
regroup_features = rearrange(regroup_features,
'b (l c) h w -> b l c h w',
l=max_len)
mask = torch.from_numpy(np.array(mask)).to(regroup_features.device)
return regroup_features, mask
相关论文
- arXiv:2404.14022
