目前使用Latex的的一些问题,也是很多新手常常遇到的
- 一些命令不知道名字或者不知道是否有类似的命令,官方没有友好的reference.
- 报错信息有些让人疑惑,一些标记语法写法让程序员很难受.
- Latex编译速度并不快
- 本地编写Latex光装环境就难倒一批人.
- 一些库之间冲突太多,有些时候排版也不自然.
于是我想尝试一些typst作为写一些小文章、简历甚至slides.
官方Typst: Compose papers faster提供了在线的工具Typst: Compose papers faster,目前社区也挺活跃的,当然写学术论文可能还是Latex占据绝大多数生态,不过在写个人文章或者简历方面Typst还是有优势的
下面以官方介绍和使用Latex的人的视角学学Typst.首先可以使用vscode安装相关插件或者官方在线工具方便协作(希望后期能超越Overleaf).
Scripting
像写代码一样写typst
表达式
在Typst中,标记和代码融合为一体。除了最常见的元素(加粗、斜体等表示)外,所有元素都是用函数创建的。为了尽可能方便,Typst提供了紧凑的语法来将代码表达式嵌入到标记中:用#符号引入表达式,在表达式完成后继续正常的标记解析。如果一个字符将继续表达式,但应被解释为文本,则表达式可以强制以分号(;)结束。
Blocks
有两种块,code blocks和content block,可以随意地嵌套1
2
3
4
5
6#{
let a = [from]
let b = [*world*]
[hello ]
a + [ the ] + b
}
绑定和解构
1 | #let name = "Typst" |
Let绑定也可以用来解构数组和字典。在这种情况下,赋值的左侧应该镜像一个数组或字典。. .操作符可以在模式中使用一次,以收集数组或字典项的剩余部分1
2
3
4
5
6
7
8
9
10
11
12
13
14
15
16
17
18
19
20
21
22
23#let (x, y) = (1, 2)
The coordinates are #x, #y.
#let (a, .., b) = (1, 2, 3, 4)
The first element is #a.
The last element is #b.
#let books = (
Shakespeare: "Hamlet",
Homer: "The Odyssey",
Austen: "Persuasion",
)
#let (Austen,) = books
Austen wrote #Austen.
#let (Homer: h) = books
Homer wrote #h.
#let (Homer, ..other) = books
#for (author, title) in other [
#author wrote #title.
]
控制语句
if和loops1
2
3
4
5
6
7
8
9
10
11
12
13
14#if 1 < 2 [
This is shown
] else [
This is not.
]
#for c in "ABC" [
#c is a letter.
]
#let n = 2
#while n < 10 {
n = (n * 2) - 1
(n,)
}
command
众所周知,我们常用的一些操作包括针对字体,包括斜体、加粗、各种数学格式,针对图(Figure)、表(Table,常用三线表)、公式(包括内联的以及占据整行的)¥%……&*(|

此外针对论文,有引用,论文参考,作者介绍(在Latex中常用\thanks)等等.上面列举了一些常用 素.
Typst目前的command有markup模式(默认)和code模式,markup模式就像是输入正常的内容,在进阶一点就是通过一些简单的标记markup改变内容表现,code模式及看起来更强大,能调用许多命令.
通过#使用code模式,[]在code模式中将使用content.
| New mode | Syntax | Example |
|---|---|---|
| Code | Prefix the code with # | Number: #(1 + 2) |
| Math | Surround equation with | |
| Markup | Surround markup with [..] | let name = [*Typst!*] |
Arguments
code模式就像函数一样,有参数,也需要content(相当于输入).
一个函数可以有多个参数。有些参数是位置参数。
许多函数使用命名参数而不是位置参数来提高可读性。
1
2
3
4
Typst is an #underline[alternative]
to LaTeX.
#rect(fill: aqua)[Get started here!]
Data Types
| Data type | Example |
|---|---|
| Content | [*fast* typesetting] |
| String | "Pietro S. Author" |
| Integer | 23 |
| Floating point number | 1.459 |
| Absolute length | 12pt, 5in, 0.3cm, … |
| Relative length | 65% |
内容和字符串之间的区别在于,内容可以包含标记,包括函数调用,而字符串实际上只是一个普通的字符序列
Typst提供控制流结构和操作符,例如用于添加内容的+或用于检查两个变量之间是否相等的==1
2
3
4
5#if 1 < 2 [
This is shown
] else [
This is not.
]
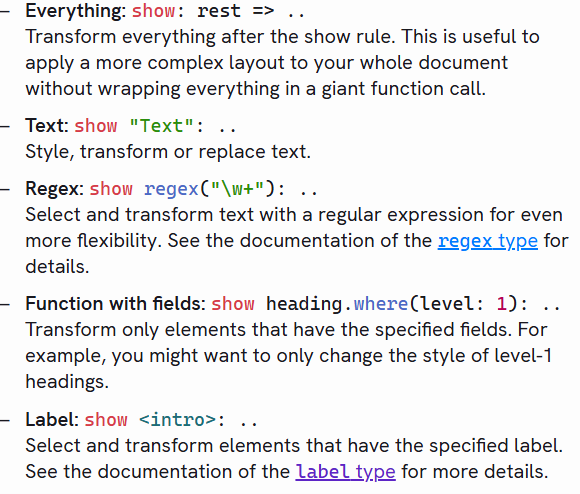
show rule
使用show规则,您可以重新定义Typst如何显示某些元素。指定Typst应该以不同的方式显示哪些元素以及它们的外观。Show规则可以应用于文本实例、许多函数,甚至整个文档。1
2
3
4
5
6
7#show "ArtosFlow": name => box[
#box(image(
"logo.svg",
height: 0.7em,
))
#name
]
上面第一个也可以省略内容参数,直接写函数1
2
3
4
5
6
7
8
9
10
11
12
13
14
15#show: project.with(
theme: rgb("#0F83C0"),
name: "proanimer",
title: "Software Engineer",
contact:(
contact(
text: "personal blog",
link: "https://sekyoro.top"
),
contact(
text: "gmail",
link:"mailto:bukalala174@gmail.com"
)
)
)
set rule
1 | #set heading(numbering: "I.") |
show和set是两种全局设置样式的表达式,差别是show 更细致,针对选择的元素
textto set font family, size, color, and other properties of textpageto set the page size, margins, headers, enable columns, and footersparto justify paragraphs, set line spacing, and moreheadingto set the appearance of headings and enable numberingdocumentto set the metadata contained in the PDF output, such as title and autho
Field获取
可以使用点表示法访问值上的字段。值可以是:
- a dictionary that has the specified key,
- a symbol that has the specified modifier,
- a module containing the specified definition,
- content consisting of an element that has the specified field. The available fields match the arguments of the element function that were given when the element was constructed.
1 | #let dict = (greet: "Hello") |
实战写一个简历
你并不需要看每一个方法的介绍,看多了也没用,先来看看其他人怎么写的.
前置知识
首先需要一个基本模板,模板中包括设置一些基本值,以及一些辅助函数.
基本值包括字体、页面等配置.一般使用#set和#show设置.1
2
3
4
5
6
7
8
9
10
11
12
13
14#set par(justify: true)
#set text(
font: "Linux Libertine",
size: 11pt,
)
#set page(
paper: "us-letter",
header: align(
right + horizon,
title
),
...
)
//设置页面,段落与字体
考虑通过一个show rule和函数包装起来1
2
3
4
5
6
7
8
9#let conf(title,doc) = {
set par(justify: true,)
set text(font:"0xProto Nerd Font Propo",size:11pt)
}
#show: doc => conf(
"Paper title",
doc
)
使用命名参数,这样需要在写函数时设置默认值.1
2
3
4
5
6
7
8
9
10
11
12
13
14
15
16
17
18
19
20
21
22
23
24
25
26
27
28
29
30
31
32
33
34
35
36
37
38
39
40
41
42
43
44
45
46
47
48
49#let conf(
title: none,
authors: (),
abstract: [],
doc,
) = {
// Set and show rules from before.
...
set align(center)
text(17pt, title)
let count = authors.len()
let ncols = calc.min(count, 3)
grid(
columns: (1fr,) * ncols,
row-gutter: 24pt,
..authors.map(author => [
#author.name \
#author.affiliation \
#link("mailto:" + author.email)
]),
)
par(justify: false)[
*Abstract* \
#abstract
]
set align(left)
columns(2, doc)
}
#show: doc => conf(
title: [Towards Improved Modelling],
authors: (
(
name: "Theresa Tungsten",
affiliation: "Artos Institute",
email: "tung@artos.edu",
),
(
name: "Eugene Deklan",
affiliation: "Honduras State",
email: "e.deklan@hstate.hn",
),
),
abstract: lorem(80),
doc,
)
在单独的文件中写模板,使用import导入并使用函数1
2
3
4
5
6
7
8
9
10
11
12
13
14
15
16
17
18
19
20
21
22
23
24
25
26
27
28
29
30
31
32#import "conf.typ": conf
#show: doc => conf(
title: [
Towards Improved Modelling
],
authors: (
(
name: "Theresa Tungsten",
affiliation: "Artos Institute",
email: "tung@artos.edu",
),
(
name: "Eugene Deklan",
affiliation: "Honduras State",
email: "e.deklan@hstate.hn",
),
),
abstract: lorem(80),
doc,
)
= Introduction
#lorem(90)
== Motivation
#lorem(140)
== Problem Statement
#lorem(50)
= Related Work
#lorem(200)
也可以使用#import "temp.typ": *导入去掉命名空间.
函数
1 | // Call a function. |
函数是Typst的基本构建块。Typst提供了各种排版任务的函数。此外,您编写的标记是由函数支持的,所有的样式都是通过函数实现的。1
2
3
4
5
6
7
8
9
10
11
12
13
14
15
16
17
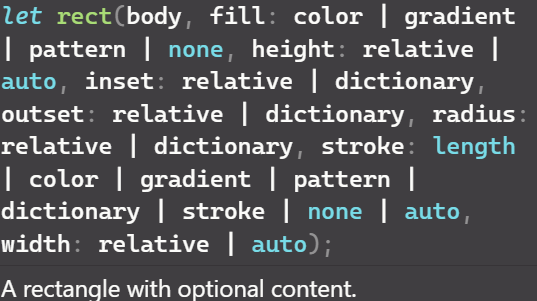
18#let alert(body, fill: red) = {
set text(white)
set align(center)
rect(
fill: fill,
inset: 8pt,
radius: 4pt,
[*Warning:\ #body*],
)
}
#alert[
Danger is imminent!
]
#alert(fill: blue)[
KEEP OFF TRACKS
]
函数有with和where,with返回一个预先应用了给定参数的新函数1
2
3
4
5// 返回一个选择器,该选择器筛选属于此函数的元素,其字段具有给定参数的值
#show heading.where(level: 2): set text(blue)
= Section
== Subsection
=== Sub-subection
看看别人的
我在Github上搜刮了一堆别人的模板,写的很不错. 主要使用的方法就是上面提到的函数、set rule,show rule以及map,join等方法1
2
3
4
5
6
7
8
9
10
11
12
13
14
15
16
17
18
19
20
21
22
23
24
25
26
27
28
29
30
31
32
33
34
35
36
37
38
39
40
41
42
43
44
45
46
47
48
49
50
51
52
53
54
55
56
57
58
59
60
61
62
63
64
65
66
67
68
69
70
71
72
73
74
75
76
77
78
79
80
81
82
83
84
85
86
87
88
89
90
91
92
93
94
95
96
97
98
99
100
101
102
103
104
105
106#let contact(text:"",link:none) = {
(text:text,link:link)
}
#let subSection(title:"",titleEnd:none,subTitle:none,subTitleEnd:none,content:[]) = {
(title:title,titleEnd:titleEnd,subTitle:subTitle,subTitleEnd:subTitleEnd,content:content)
}
#let section(title:"",content:subSection()) = {
(title:title,content:content)
}
#let project(
theme:rgb("#4273B0"),
name:"",
email:none,
title:none,
contact:((text:[],link:"")),
skills:(
languages:()
),
main:(
( title:"",content:[])
),
sidebar:(),
body
) = {
let backgroundTitle(content) = {
align(center,box(fill:theme,text(white,size:1.25em,weight:"bold",upper(content)),width:1fr,inset:0.3em))
}
let secondaryTitle(content) = {
text(weight:"bold",size:1.125em,upper(content))
}
let italicColorTitle(content) = {
text(weight:"bold",style:"italic",size:1.125em,theme,content)
}
let contactColumn = align(center)[#contact.map(c => {
if c.link == none [
#c.text\
] else [
#underline(link(c.link,text(theme,c.text)))\
]
}).join()]
grid(
columns:(1fr,2fr),
column-gutter:2em,
contactColumn,
titleColumn
)
set par(justify: true)
let formattedLanguageSkills = [
#text(skills.languages.join(" • "))
]
let createLeftRight(left:[],right:none)={
if(right == none) {
align(start,text(left))
}else{
grid(
columns:(1fr,1fr),
align(start,text(left)),
align(end,right)
)
}
}
let parseSubSections(subSections) = {
subSections.map(s=>{
[
#createLeftRight(
left:secondaryTitle(s.title),
right:if s.titleEnd != none [
#italicColorTitle(s.titleEnd)
]
)
#if s.subTitle != none or s.subTitleEnd != none [
#text(top-edge: 0.2em,
createLeftRight(left: italicColorTitle(s.subTile),right:s.subTitleEnd)
)
]
#s.content
]
}).join()
}
let parseSection(seciton) = {
section.map(m=>{
[
#backgroundTitle(m.title),
#parseSubSections(m.content)
]
}).join()
}
let mainSection = parseSection(main)
let sidebarSection = parseSection(sidebar)
grid(
columns: (1fr,2fr),
column-gutter: 1em,
sidebarSection,
mainSection
)
// Main body.
set par(justify:true)
show: columns.with(3,gutter:1.3em)
}1
2
3
4
5
6
7
8
9
10
11
12
13
14
15
16
17
18
19
20
21
22
23
24
25
26
27
28
29
30
31
32
33
34
35
36
37
38
39
40
41
42
43
44
45
46
47
48
49
50
51
52
53
54
55
56
57
58
59
60
61
62
63
64
65
66
67
68
69
70#import "template.typ": *
#set page(
margin:(
left: 10mm,
right: 10mm,
top: 15mm,
bottom: 15mm
)
)
#set text(font: "Mulish")
#show: project.with(
theme: rgb("#0F83C0"),
name: "proanimer",
title: "Software Engineer",
contact:(
contact(
text: "personal blog",
link: "https://sekyoro.top"
),
contact(
text: "gmail",
link:"mailto:bukalala174@gmail.com"
)
),
main:(
section(
title:"Work Experience",
content:(
subSection(
title: "Freelancer",
subTitle: "Software Engineer",
content:list(
["Developed a personal blog using Gatsby and React, with a focus on performance and accessibility."],
["Implemented a custom CMS using React and Firebase, allowing for easy content management."],
["Optimized the blog for SEO, resulting in a 50% increase in organic traffic."],
["Designed and implemented a custom theme, resulting in a 30% increase in user engagement."]
)
)
)
)
),
sidebar:(
section(
title: "Skills",
content:(
subSection(
title: "Languages",
content: list(
["JavaScript", "TypeScript", "Python", "Java", "C++"]
)
),
)
),
section(
title:"Education",
content:(
subSection(
title: "University of British Columbia",
titleEnd: "Vancouver, BC",
subTitle: "Bachelor of Computer Science",
subTitleEnd: "(2018 - 2022)"
)
)
)
)
)
)
肯定没有必要使用typst写简历的,主要还是想替代Latex写点小论文或者文章,可以拿简历练练手.
如果真需要简历可以在网上填写信息直接生成.
如何写一个幻灯片
用手拖来拖去制作幻灯片实在太麻烦了,我们喜欢简洁、可控与重用.
1 | // 为了跨项目重用构建块,可以创建和导入Typst包.包导入被指定为名称空间、名称和版本的三元组 |
使用编程的方式写ppt主要目的是为了方便写公式,图片摆放以及更加简洁.这里使用touying包制作,目前typst都是生成pdf格式的,也完全可以使用相关软件播放.1
2
3
4
5
6
7
8
9
10
11
12
13
14
15
16
17
18
19
20
21
22#import "@preview/touying:0.4.2": *
#let s = themes.simple.register()
#let (init, slides) = utils.methods(s)
#show: init
#let (slide, empty-slide) = utils.slides(s)
#show: slides
= Title
This is written in Typst.
== First Slide
Hello, Touying!
This is written in Typst.
Attention = $frac(Q*K^(T),sqrt(d))*V$
#pause
Hello, Typst!
最后说一下,利用jgm/pandoc: Universal markup converter (github.com)完全可以实现latex与typst互换.
使用体验
目前使用感觉还是很不错,优点包括两个
- 使用命令语法对程序员友好,官方文档全面
- 编译速度快,本地写也很方便
如果要说缺点就是 生态相对Latex没那么好,如果想要实现一些效果网上可能没有现成方法,有些东西目前也没有支持Roadmap – Typst Documentation
